

How To Register Ocx File
Sometimes the applications may miss registering the DLL or OCX files, due to which users will face errors and applications won't work properly. Because of this, users will require to register the files by themselves. The registering and unregistering of the application extension files (DLL or OCX) are done by RegSvr32 utility. In this article, we will teach yous how easily you can annals a DLL or OCX file in your operating arrangement.
Registering a DLL or OCX File in Windows
By registering a DLL or OCX, users are adding the data to the registry and so that Windows tin use those files. The information will be in the course of a name or CLSID. This makes it easier for Windows to detect the correct DLL or OCX when a role related to information technology is used within some other plan. It will incorporate the path of these files through which the executable lawmaking for the component volition be used. The information saved in the registry will always refer to the latest version of the component. This is required only in rare cases because in most cases the applications volition annals these files during installation. It can as well be used for the repairing of the Windows issues that include these files. Some extra parameters that you lot can add to the commands:
- /u – Unregister the DLL or OCX file
- /southward – Silent fashion, it will show no bulletin boxes.
- /I – If used without /u and then calls DLLInstall(TRUE) to install and If used with /u then calls DllInstall(Simulated) to uninstall the DLL and DllUnregisterServer.
- /north – For not calling the DllRegister Server or DllUnregisterServer. This option must be used with /i.
You can but annals the DLL or OCX files that are registerable. Some files volition have no DLLRegisterServer() functions through which it tin register. Those files are ordinary and take goose egg to practice with registering. An example can exist taken from game DLL files that stay in the folder and practice their chore without getting registered in the kickoff place.
Note: Make sure you already take the DLL or OCX file available before trying these methods.
Using the Elevated Control Prompt to Register a DLL or OCX File
- Agree the Windows key and printing S to open the search function. Blazon cmd, right-click on it and cull Run equally administrator selection
Annotation: You can as well press Alt + Shift + Enter after typing cmd in the search function.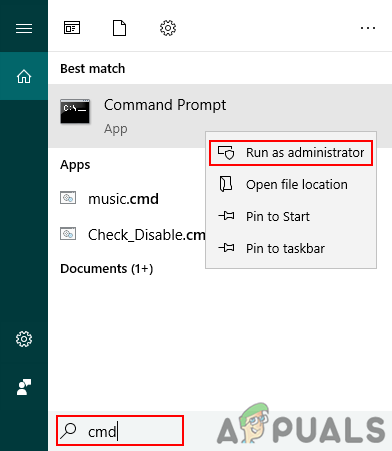
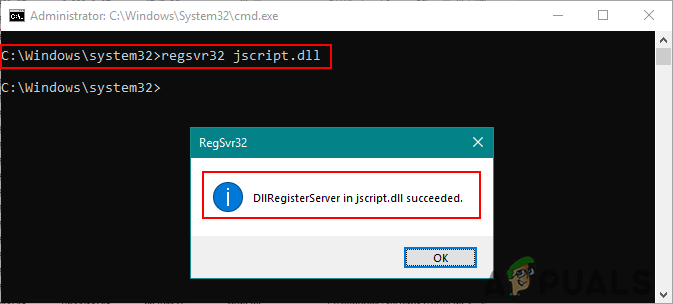
Opening elevated command prompt - Now blazon the command below to register the DLL or OCX file.
regsvr32 jscript.dll
Note: jscript.dll is the file name that you tin change to whatever file you desire to register.
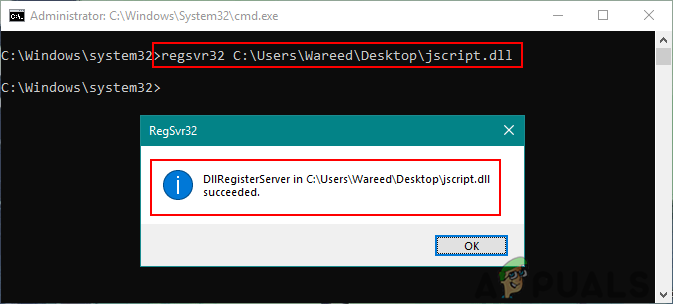
Successfully registered DLL file - You can too register a DLL or OCX file that is located in a different location past typing the following command.
regsvr32 C:\Users\Kevin\Desktop\jscript.dll
Registering DLL on a unlike path - If the file is non registerable so you may get the error as shown beneath:
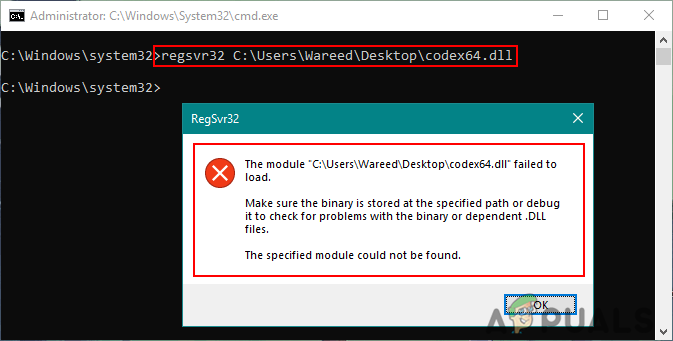
Mistake for non registering - Sometimes the error can be because you are trying to register a 32-scrap DLL or OCX file through 64-bit Regsvr32. You need to use the 32-chip Regsvr32 that is located in the Syswow64 folder.
- You can blazon the post-obit control to register 32-bit DLL or OCX in a 64-scrap operating system.
%SystemRoot%\SysWOW64\regsvr32 jscript.dll
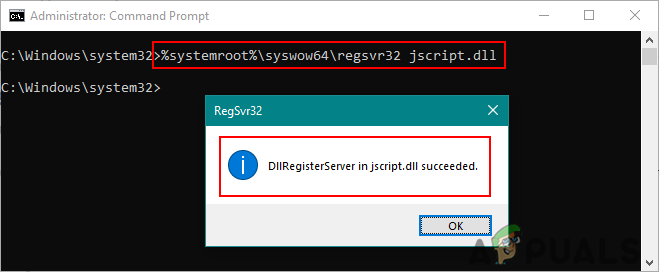
Registering 32-scrap DLL file on 64-bit Windows
You tin can also use PowerShell with the same commands to annals DLL or OCX files.
![]()

How To Register Ocx File,
Source: https://appuals.com/register-dll-or-ocx-windows/
Posted by: skaggswoustravight73.blogspot.com
0 Response to "How To Register Ocx File"
Post a Comment